K Rend Advise

Members online

Ext10

New Member
Hi,

Looking for some advise from those with experience of using K Rend.

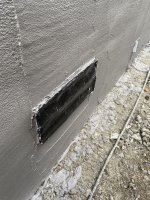
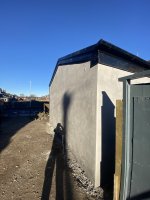
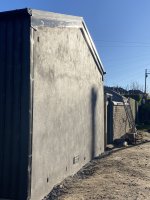
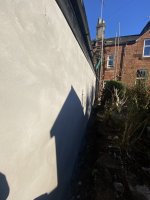
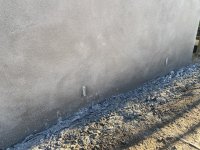
Earlier this week (Mon & Tues) I had K-Rend applied to my house extension. The K- Rend was completed by a subbie through my builder. A K-Rend base coat was applied and scratched on the Mon with a top coat of K Rend Silicone K1 in pewter grey applied on the Tues. The job was completed by hand with the top coat finished with a sponge. The total thickness of the base coat and top coat is approx 10mm. I believe the top coat can only be 3mm at best. I’ve never used K-Rend before but from looking at pictures online the final finish looks quite different. It was dry on the Mon & Tues but there was then rain in the early hours of Wed with this being heavy for 3hrs or so from 6am. The render was not protected.

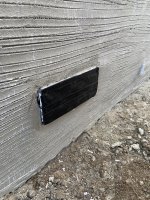
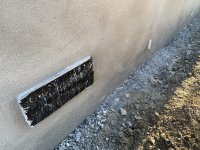
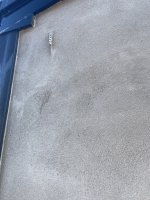
Attached are some photographs of the final finish. These show that the colour is not uniform throughout and not as solid as I would have thought it should be. On the gable end there appears to be a line 2/3rds of the way up with the top 1/3rd showing a different type finish/texture. In some places it looks like there are patches where you can see the base coat although I’m not 100% as the top coat and base coat are probably the same colour which in hindsight now seems a pretty stupid thing to have done on my part.

Basically from reading online I believe the base coat should have been applied 6-8mm thick and then the K1 topcoat 10-12mm thick on top of that before then being scraped back 2mm. The final thickness should have been 16-18mm.

I would really appreciate any advice or comments folk may have before I raise this with my builder. As well as the overall look, I’m also concerned wrt it’s durability and how well it will do it’s job i.e provide the weather protection and breath ability to the block work.

Wrt to fixing this so that we can get the final finish required could this simply be resolved by applying a further K1 top coat and then scraping this back?

Cheers,
 

Attachments

  • 2CCBA4CA-18C0-4CC4-BAE6-5FF76A22B233.jpeg
    2CCBA4CA-18C0-4CC4-BAE6-5FF76A22B233.jpeg
    3 MB · Views: 151
  • AA854062-42F5-4DE7-9959-F4FECA17B4ED.jpeg
    AA854062-42F5-4DE7-9959-F4FECA17B4ED.jpeg
    3.8 MB · Views: 136
  • 7731204A-5B1C-4521-B522-04CCDEF0E04B.jpeg
    7731204A-5B1C-4521-B522-04CCDEF0E04B.jpeg
    5.1 MB · Views: 138
  • 7BB4F114-AC1A-49C1-8279-0BF8C21772EA.jpeg
    7BB4F114-AC1A-49C1-8279-0BF8C21772EA.jpeg
    1.7 MB · Views: 152
  • 92AA92C3-79A2-40DA-AC8A-B462816B5F69.jpeg
    92AA92C3-79A2-40DA-AC8A-B462816B5F69.jpeg
    2 MB · Views: 133
  • D5B4C8C5-B07E-4AEB-9D2F-37A1CF60CB20.jpeg
    D5B4C8C5-B07E-4AEB-9D2F-37A1CF60CB20.jpeg
    1.9 MB · Views: 130
  • 9229C728-C697-485F-BB89-A12ABC623D19.jpeg
    9229C728-C697-485F-BB89-A12ABC623D19.jpeg
    2.6 MB · Views: 129
  • F3B7ACC8-2FC5-4FAD-9913-04D9CF125045.jpeg
    F3B7ACC8-2FC5-4FAD-9913-04D9CF125045.jpeg
    4 MB · Views: 128
  • A8F3DC50-F89F-445B-9921-E3CDBAB7E786.jpeg
    A8F3DC50-F89F-445B-9921-E3CDBAB7E786.jpeg
    3.9 MB · Views: 135
  • 20223570-BA24-45DE-A751-B8A55B2727A8.jpeg
    20223570-BA24-45DE-A751-B8A55B2727A8.jpeg
    6 MB · Views: 166
No renderer visited your property .

You will only resolve this by employing a skilled pro …. (@warning do not let same outfit sort it ) … The end ….
Hi 000,

Thanks for your response and advice. Is this fixable in your opinion and if so what would you recommend?
 
Hi 000,

Thanks for your response and advice. Is this fixable in your opinion and if so what would you recommend?

@ you have no dpc break in render @via a bead ..
@ this stage taking it off could make more damage than good ——@go thin coat over the lot…(you need a pro to visit in-real, life to make real judgement..
Idk . if they meshed it ruled it ect … (still needs that bead break @ dpc …
 
Thanks 000, really appreciate the feedback, hadn’t realised about the bead break at the DPC. That’s definitely a concern. I’m pretty sure that it wasn’t meshed either. Taking your advice and trying to organise for others to come round and see it in person and tell me what they think.
 
@ you have no dpc break in render @via a bead ..
@ this stage taking it off could make more damage than good ——@go thin coat over the lot…(you need a pro to visit in-real, life to make real judgement..
Idk . if they meshed it ruled it ect … (still needs that bead break @ dpc …
Sorry 000, forgot to ask, could you please advise on how you would retrospectively add a DPC break in the render via a bead? Would I have to remove render below DPC level and then install stop bead or bell bead that I could then run a thin top coat up to. I’m just trying understand as much as I can so that when I get someone round I can have a sensible conversation and actually understand what they are talking about.
 
Sorry 000, forgot to ask, could you please advise on how you would retrospectively add a DPC break in the render via a bead? Would I have to remove render below DPC level and then install stop bead or bell bead that I could then run a thin top coat up to. I’m just trying understand as much as I can so that when I get someone round I can have a sensible conversation and actually understand what they are talking about.
No needs cutting away Just cut render @50mm above dpc
Remove below that line ,install beads ,use something like hp 12 below as a finish
However if no mesh , I would be removing the lot
 
Sorry 000, forgot to ask, could you please advise on how you would retrospectively add a DPC break in the render via a bead? Would I have to remove render below DPC level and then install stop bead or bell bead that I could then run a thin top coat up to. I’m just trying understand as much as I can so that when I get someone round I can have a sensible conversation and actually understand what they are talking about.
You can grind a brake line out re bead and go over it with whatever you want just make sure you get someone who knows what they're doing
 
Hi 000,

Thanks for your response and advice. Is this fixable in your opinion and if so what would you recommend?


If it was me, all off and start again. As not sure how well prepped that work is.


Another option would be find and grind dpc line out and then silicone system then on, but that's hoping that that work already done is stuck well enough.
 
No needs cutting away Just cut render @50mm above dpc
Remove below that line ,install beads ,use something like hp 12 below as a finish
However if no mesh , I would be removing the lot
Thanks 000, would it be possible to retrospectively add a mesh before applying the top coat. Could you put on 6mm beads, a skim of base coat on top of what has already been applied with embedded mesh, then primer and top coat. Appreciate I am trying to polish a turd here and my gut just tells me to try and take everything off and start from the beginning. I’m just wanting to try and learn as much as I can so I don’t get burnt again.
 
If it was me, all off and start again. As not sure how well prepped that work is.


Another option would be find and grind dpc line out and then silicone system then on, but that's hoping that that work already done is stuck well enough.
Cheers Bobski, totally understand wanting to start again. I take it it’s not going to be the easiest to get off? It’s been applied to block work and I know that that was on the piss as well!!
 
That is nuts, why would anybody leave it like this. The guy had no idea whatsoever and the lot needs to come down and start from scratch.
 
You can grind a brake line out re bead and go over it with whatever you want just make sure you get someone who knows what they're doing
Cheers Elite, I’ve started asking around folk I know in the building trade, hopefully I can get someone round to eyeball it and see what can be done. Really appreciate all the advice from folk as the more I can understand the better. Just wish I had spent more time to understand exactly what should have been done in the first place instead of just blindly putting my trust in my builder!
 
That is nuts, why would anybody leave it like this. The guy had no idea whatsoever and the lot needs to come down and start from scratch.
Cheers Kasper, that’s my fear. Would you just leave taking it down and back to the block work until the spring when it’s drier and warmer or could it cause further issues if I was to leave to leave it like this over the winter?
 
Cheers Kasper, that’s my fear. Would you just leave taking it down and back to the block work until the spring when it’s drier and warmer or could it cause further issues if I was to leave to leave it like this over the winter?
It doesn't need to come down at all you'll just destroy the blocks trying to get it off, what's on will still be solid even though it's been done wrong. My advice would be to re bead and base with mesh, you could even secondary fix with some plugs if it makes you feel better then top with whatever you want, the only thing you may need to knock off would be around any openings if the frames won't take allow another bead over the top, basically just make sure the windows still open properly
 
I don't use K Rend. But could you Tyrolean or Silicone it? Regarding DPC level is it a solid wall?

How much did you pay out of interest? (minus the builders cut approx 20%)
 
It doesn't need to come down at all you'll just destroy the blocks trying to get it off, what's on will still be solid even though it's been done wrong. My advice would be to re bead and base with mesh, you could even secondary fix with some plugs if it makes you feel better then top with whatever you want, the only thing you may need to knock off would be around any openings if the frames won't take allow another bead over the top, basically just make sure the windows still open properly
Thanks Elite, luckily it’s just the gable end of the extension and a boundary wall with no windows or openings to deal with.
I don't use K Rend. But could you Tyrolean or Silicone it? Regarding DPC level is it a solid wall?

How much did you pay out of interest? (minus the builders cut approx 20%)
Hi FreeD,

It’s a solid wall made from 100mm thick block with a 50mm cavity to the timber kit OSB board which is covered with a breathable membrane.

I haven’t paid anything as yet. It’s all part of the works associated with the house extension and was included within the overall contract value. I’ve asked my architect (who’s supposed to be overseeing the build) to confirm the costs associated with the rendering.

The K-Rend K1 render that as been applied is silicone based. I’ve not heard of Tyrolean but will check it out.


I don't use K Rend. But could you Tyrolean or Silicone it? Regarding DPC level is it a solid wall?

How much did you pay out of interest? (minus the builders cut approx 20%)
 
Thanks Elite, luckily it’s just the gable end of the extension and a boundary wall with no windows or openings to deal with.

Hi FreeD,

It’s a solid wall made from 100mm thick block with a 50mm cavity to the timber kit OSB board which is covered with a breathable membrane.

I haven’t paid anything as yet. It’s all part of the works associated with the house extension and was included within the overall contract value. I’ve asked my architect (who’s supposed to be overseeing the build) to confirm the costs associated with the rendering.

The K-Rend K1 render that as been applied is silicone based. I’ve not heard of Tyrolean but will check it out.

The cheapest option mate is to grow a creeper up it. Just be careful to fill any cracks first. Just make sure you buy an evergreen don't want it losing all its leaves in winter and revealing that!!
 
Top