problems with CPI two coat render

Status
Not open for further replies.

toddylaguna

New Member
Hi All,

A tale of woe.

About 2 years ago we had a new extention, built of lightweight blocks, rendered in a CPI two coat system with a mesh set into the basecoat. About six months later we noticed that one corner of the render had blown. We contacted CPI and the rendering company who both said it was an underlying problem with the structure. The renderer offered to repair the blown area at extra cost to us. We buried our heads for a while. Slowly different areas have cracked and blown. CPI sent us an 'independent' materials specialist to look at what was going on. His report concluded that it was the structure and that the render was not the problem or the application. More time passed and we then contacted our structural engineer, As there was no cracking to the interior walls, which are hardwalled and then skimmed, he concluded the structure was fine. We then knocked off some off the top coat where it had blown and the base coat is just mush. Obviously water has got in where it has cracked, but surely the basecoat should remain solid and bonded. The renderer had said when he first came to look at the damaged area that we shouldn't worry as the basecoat was water proof, but in this case that can't be true. So any ideas why the basecoat would turn to mush? The topcoat although cracked and blown is still solid.

thanks T
 
22jasper and 4400kevin,

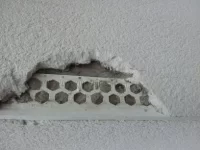
Not sure which the product was, although it was a grey basecoat with mesh and then a white topcoat. The render has blown mainly at the beads. Although in a couple of other areas it has cracked and blown. The first area that blew was from a corner bead, but stretched back a couple of feet. You can see that the mesh hasn't been bedded into the corner bead basecoat. In the other areas when you knock off the topcoat the basecoat is just soft and can be scrapped off.
 
Which lightweight blocks were used?

There's a very big chance that they are softer than the render and this is causing the cracking.

Never used CPI so can't comment on the mush thing.
 
Maybe the basecoat was killed by two much suction initially and the mush thing is a powdery basecoat that's wet?
 
The blocks are celcon. I believe the blocks haven't cracked as most of the cracks are in line with the render beads. The cracks started after 6 months and the render has deteriorated over the last 18 months. I'm guessing the basecoat is powdery, as Goody said, and where cracks are, water has got in and turned it to mush. Why would the basecoat have failed though? Does it have a shelf life? I'm guessing it would have been very hard to apply if it was out of date?
 
What beads were used? Plastic or SS?

Plastic will expand and contract more than SS and create these bead fractures, esp if not fixed correctly.

Incidentally i would suggest as others have, that the original background has sucked the moisture from the initial backing coat leaving it weak and not properly chemically bonded to the blockwork.
 
Do CPI recomend a primer before using high bond or just a Wetting down? tbh it sounds like it's been followed by the book did he use high bond or another base coat ?
It won't have anything to do with beads once the gears on I doubt they would move that much to blow the render
 
best to strip back and start again try using microgobbetis on the blocks prior to rendering this will kill and even out your suction
good luck
 
Post some pics and you need to find out what was used as a base coat and top coat or you're pissing in the wind
 
Maybe the basecoat was killed by two much suction initially and the mush thing is a powdery basecoat that's wet?

I bet that the base coat has dried before being allowed to set and cure. I have seen this many times over the years. Was the base coat recommended for Celcons? Also it has come to light recently about 'cheap' beads expanding in the hard frost of the winters of 2 & 3 years ago. Although I would expect the base coat to be cracked or even blown but not 'mushy'.

Hack it off and clean the blocks of all remnants of the old mortar. Start again with a contractor who can get a company to supply the spec and materials. Get a complete package, base coat, mesh, beads and top coat so if it goes tits up the company will be responsible (Weber excluded of course). Parex and SAS may have the answer to this.
 
He should have used cpi high bond as a base then general over the top the celcons have sucked the life out the scratch
 
The Celcons aren't the problem, the problem I'd guess is as Gary has said the scratch coat has been kept moist enough to cure properly. I take a lot of time and effort making sure that scratch coats are kept moist for a few days, often going back to jobs after the sun has gone down to wet down. I can't ever remember seeing another spread around my way bother doing this, but I have seen lots of people have problems with their rendering.
 
thanks for all your inputs.

Just found the products used. The base coat was CPI's high bond (flex) render with a polymesh then topped with a their one coat render. The corner beads are the white plastic variety. Will take photos today and post. The render was put up in a period of 'heavy' rain.
 
so did he put on the one coat render in one coat over the high bond or did he high bond, scratch with OCR then top with OCR?

Sound like he did it all correct to me.However he may just be saying it as he knows thats what he should have done, which is more plauseable.

Take some pics of the render and post them up, Highbond looks different to CPI OCR so we should be able to see.
 
The Celcons aren't the problem, the problem I'd guess is as Gary has said the scratch coat has been kept moist enough to cure properly. I take a lot of time and effort making sure that scratch coats are kept moist for a few days, often going back to jobs after the sun has gone down to wet down. I can't ever remember seeing another spread around my way bother doing this, but I have seen lots of people have problems with their rendering.

If he did it one coat in 2 passes with mesh the same day over the high bond that has been applied 24 hours before hand this is not a issue. Which is why OCR is so nice :RpS_thumbup:
 
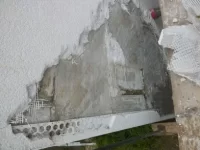
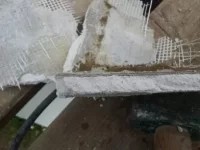
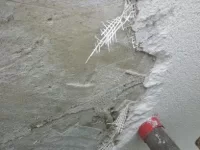
Have just hacked off a bigger area and attached pics. The basecoat looks to be only 2mm thick. The blocks are wet over the whole area, but due to the size of the crack and the fact that we are fairly exposed I'm not that surprised. In some parts there seems to be another coat. The base coat is grey, then some patches of cream and then white.
 

Attachments

  • problems with CPI two coat render
    render 002.webp
    28.7 KB · Views: 404
  • problems with CPI two coat render
    render 003.webp
    18.6 KB · Views: 382
  • problems with CPI two coat render
    render 001.webp
    31.3 KB · Views: 448
  • problems with CPI two coat render
    render 004.webp
    34.9 KB · Views: 384
You would have to have all the base coats lab tested as far as I know he's followed the rule book

Rendering on light weight blocks isnt really the best idea mind it's worth bearing that in mind
 
You would have to have all the base coats lab tested as far as I know he's followed the rule book

Rendering on light weight blocks isnt really the best idea mind it's worth bearing that in mind

Light weight blocks are the spawn of the devil !
 
Spunky - I know that now! Unfortunately that's what the architect specified and the brickie was more than happy to use them. I think we're just going to hack it all off and use standard s/c render.
 
You could have the same problems you will still need a base coat to provide a key, don't lose too much faith it might just have been one of those things and chances are wont happen again
 
Brickies will never turn down using Celcons. The architect should have known better than to specify Celcons on the outside. Always have been a problem lightweight blocks and always will be. If you are going to use sand & cement then you will need a bonding agent like sbr. Beats me how in idiot of an architect gets the spec wrong but the spread has to carry the can. If he has done it to the architects spec then let the architect take the blame.

A spread I know locally was told by an architect to fix 2x1 tile battens then marine ply then building paper then expanded metal lathing.
 
Link Removed


Link Removed

Link Removed
I've never tried to post a pic on here so don't know if I've done it correctly but if I have these jobs were done fifteen plus years ago on Celcon/Thermalite blocks without any problems using plain S&C without any fancy bonding agents or special base coats just like many others over the years.
 
It looks like broken leather with a bag. How do u get it like that with a brush
We call it flogging down here where you slap the brush against the wall. Looks nothing like that
 
Status
Not open for further replies.
Back
Top