vfr12
MOTORC*NT
It’s fairly new on the market and I haven’t come across decent info on how to use it and I think I have spent enough time with it to be able to do a honest review that can help others when using it for first time . First thing I would say it’s very weird product, something i haven’t came across before. Always when using new gear I read the instructions on the bag to start with. It says 9-10L of water to 1 bag of bauwer light. You should remember you need to mix the whole bag . Start mixing it slowly or you will have 100 volcanos erupting in your face, literally. Don’t add any water, the product needs time till is mixed thoroughly.You can’t just add or take a bit . The binding agent sits on the bottom and the ashes are on the top of the bag. You can feel the disbalance once you lift the bag and always open the bag from the top.Once you mix the bag you have to be quick, there is no time to mess around. The gear has internal setting timer and it sets as quick as on the wall. Do not confuse this process with drying that’s a long process especially now. 2 bags at time works best for me when on my own. Mix it in the big gorilla bucket with enough time to finish it on the wall. For internals I found thickness at 25mm To work best . You can put more in stages, but bare in mind the product slumps. When ruling go 2-3 times over it and come back in 5 mins, you’ll see what I mean.If you are not quick enough the product will start tear and you may have some bits even falling off. This is where you have to leave it , you have done your best and any imperfections can be fixed later , when is set completely. Scrapes really good and takes any shape you want. For best results I found 11 L per bag gives you that extra minute to finish it on the wall. Always measure the water when applying by hand , always! So here is how I start.
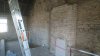
First thing you check your wall and see what the difference is . Here I have went for 25 mm . Set the laser at 100mm of the wall and marked back 75mm on the ruler to give me the wanted thickness. For brick work allow 15% more gear.

Marking top, bottom and middle over tape


Soak the wall and set your beads like the one on the left, the right one won’t hold for long . It will take about 1-2 hours before is ready.Enough time to set the whole room and get ready.

If you try to do it freehand you won’t have that time to level it like any other render. Time is crucial in this case!
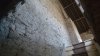
You should end up with something like this, or better


Next step is Bauwer finish which is more or less like thin coat with mesh . Will add more info in the next few days. Hope that helps anyone who is willing to give it a go. It’s a very weird product, but with great benefits.
First thing you check your wall and see what the difference is . Here I have went for 25 mm . Set the laser at 100mm of the wall and marked back 75mm on the ruler to give me the wanted thickness. For brick work allow 15% more gear.
Marking top, bottom and middle over tape
Soak the wall and set your beads like the one on the left, the right one won’t hold for long . It will take about 1-2 hours before is ready.Enough time to set the whole room and get ready.
If you try to do it freehand you won’t have that time to level it like any other render. Time is crucial in this case!
You should end up with something like this, or better
Next step is Bauwer finish which is more or less like thin coat with mesh . Will add more info in the next few days. Hope that helps anyone who is willing to give it a go. It’s a very weird product, but with great benefits.