Advice re lime render/lime wash

Gwennor

New Member
Hi,

Last August I got the facade of my Georgian house lime rendered and lime washed. House is over 200 years old.

The guy who did the rendering used what he called a lime splatter coat using NHL 3.5 with 3 coats. Mix was 3/1 then scratch coast 3:1 - mix being 2 building sand, 1 sharp sand, 1 lime fibres. Top coat was 4 building sand, 1 lime roughly 10mm for scratch coat and same for finish.

Sorry this is his description and I have to say I am not sure what precisely this all means.
4 days after the lime render the house was lime washed over a series of consecutive days.

A couple of weeks later large splotches started to appear and have not gone away. There are also fine cracks appearing.
I would enormously appreciate any advice or suggestions on what has gone wrong here and how it can be fixed. Every time it rains the lme render gets damp but then dries out very quickly except these awful splotches never go away as seen in the attached photo. The guy who did the render says that he thinks it's the problem with the lime wash having been put on too soon and says we should wait for Summer. Even if it dries out over the Summer, which remains to be seen, won't these splotches reappear in the rainy Wintry months. Our painter who did the lime wash has disappeared :( We specifically wanted the house lime rendered/lime washed because of its age.
Many thanks for any help and suggestions, Gwenn
 

Attachments

  • Advice re lime render/lime wash
    IMG_20211218_113734.jpg
    1.3 MB · Views: 503
Wrong site
Hi,

Last August I got the facade of my Georgian house lime rendered and lime washed. House is over 200 years old.

The guy who did the rendering used what he called a lime splatter coat using NHL 3.5 with 3 coats. Mix was 3/1 then scratch coast 3:1 - mix being 2 building sand, 1 sharp sand, 1 lime fibres. Top coat was 4 building sand, 1 lime roughly 10mm for scratch coat and same for finish.

Sorry this is his description and I have to say I am not sure what precisely this all means.
4 days after the lime render the house was lime washed over a series of consecutive days.

A couple of weeks later large splotches started to appear and have not gone away. There are also fine cracks appearing.
I would enormously appreciate any advice or suggestions on what has gone wrong here and how it can be fixed. Every time it rains the lme render gets damp but then dries out very quickly except these awful splotches never go away as seen in the attached photo. The guy who did the render says that he thinks it's the problem with the lime wash having been put on too soon and says we should wait for Summer. Even if it dries out over the Summer, which remains to be seen, won't these splotches reappear in the rainy Wintry months. Our painter who did the lime wash has disappeared :( We specifically wanted the house lime rendered/lime washed because of its age.
Many thanks for any help and suggestions, Gwenn
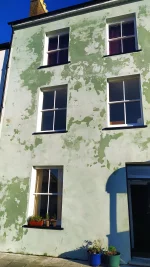
Wrong dute mste
 
Plasterer is correct, needs to be left to be dried out! Also try a different paint something like keim as it’s much better then lime wash! And still let’s the building breath
 
Plasterer is correct, needs to be left to be dried out! Also try a different paint something like keim as it’s much better then lime wash! And still let’s the building breath
Thank you for your reply. May I ask what is the precise problem with lime wash? Ok if it dries out but won't it return to this state again when the weather turns bad again after the Summer months? Or it will stay dry? So far it's been 5 months since the work was finished and the blotches have not changed at all. They are not changing in size. On the contrary they are exactly the same. Thank you for any additonal helpful suggestions you may have.
 
Un related to your patches but I think you're gonna have trouble with "rising damp" if you don't take out that paving edge right up to the render. Rain will just bounce up and soak in.
 
Thank you for your reply. May I ask what is the precise problem with lime wash? Ok if it dries out but won't it return to this state again when the weather turns bad again after the Summer months? Or it will stay dry? So far it's been 5 months since the work was finished and the blotches have not changed at all. They are not changing in size. On the contrary they are exactly the same. Thank you for any additonal helpful suggestions you may have.
It may be grease spots on the brickwork that’s coming through the render. I bet they had a sh1t bacon and egg sandwich one with red sauce one with brown, tasted like shite so threw them up the wall waiting till they fell off the wall and rendered straight over the grease stains? Not saying that’s what happened but a possibility
 
painted it too soon,,,,,1st coat of plaster leave for 3 days,,2nd coat 5 days 3rd coat 7 days and so on,,,,the lime wash id given it at least couple of months
 
lime wash has very little to do in this case.its nhl which sets in the present of h2o,not air.your plasterer should have told you to moisten the render few times a day to achieve proper set.these patches are contamination coming through ,either background or sand.
 
lime wash has very little to do in this case.its nhl which sets in the present of h2o,not air.your plasterer should have told you to moisten the render few times a day to achieve proper set.these patches are contamination coming through ,either background or sand.
your a big stranger m8
 
lime wash has very little to do in this case.its nhl which sets in the present of h2o,not air.your plasterer should have told you to moisten the render few times a day to achieve proper set.these patches are contamination coming through ,either background or sand.
Thank you for your reply. How can it be fixed? If you have any advice? Much appreciated.
 
It's most likely that the lime wash has dried at different rates as a result of differing levels of porosity in the backing coats. It's not due to retained moisture, although patches might be darker after rain. The lighter patches will have dried more quickly. Was the background uniform? Were some areas overworked during that hot summer when the surface of the backing coats cured at different rates. May account for the fine cracks, too. How was the elevation protected during curing? More limewash may not solve problem, as the patchiness will telegraph through subsequent layers. I've had good results this year on wall with similar problems. Try a shelter coat of render, mixed hot using quicklime and the same aggregates used in the backing coats. Apply by brush. Or try thicker application (2mm). hot mixed quicklime and mixture of finer aggregates, apply using wooden float and finish with sponge float. This worked for me. Apply limewash while surface still green. I mix thick limewash, 1 part quicklime 2 parts water, apply by brush after dampening background. Protect work from direct sun and wind, and gently mist if it appears to be drying too quickly during the first day. Alternatively, it is claimed that l*m*-g***n Solo primer will even out suction across a surface, which will then allow subsequent coats of sheltercoat or limewash to dry uniformly. I haven't tried this yet, but intend to use it on wall with patches of cement render repairs amongst a mainly lime based render.
 
The problem is the hydraulic lime, it's not capillary active enough to dry out a wall. Hydraulic lime should only be used when you want to create a moisture barrier: only use it for foundation work or places that are submerged in water.

The appropriate fix here is to remove the render completely. Do a scratch coat of earth-lime mortar with hay mixed into it. Then a float coat of earth-lime mortar without hay. Then finish it with either a lime wash or a skim coat of lime + very fine sand.

My personal earth-lime mortar recipe:
- 10% quicklime (Supervical)
- 45% loam (Claytec Base)
- 45% fine, white, sharp silica sand (0-1mm)

Top coat:
- 33% quicklime
- 66% fine, white, sharp silica sand (0-1mm)
- (add a little natural earth ochre pigment if you want a warm white, rather than an icy white)

When adding hay, just add it to feel. You want enough in there, but it should still spread on the wall easily.

Unfortunately NHL or hydraulic lime is not suited for walls above ground. Look into Nigel Copsey's historical analysis work to learn more.
It's not so much that NHL isn't suited to walls above ground as it is that it's not suited to walls in cases like this. It's as you say, the breathability just isn't there and it will cause problems like this. Your mix is interesting, but even just a simple hydrated lime and sand mix would do the job.
NHL is used in applications like Tadelakt, so it can be used on walls above ground.
>It's not so much that NHL isn't suited to walls above ground

in my experience as well as new scientific research NHL isn't appropriate in cases where there's no damp course in the wall nor a mechanical ventilation system. Damp courses also decay over time, which is problematic, and mechanical ventilation requires a constant supply of electrical energy and frequent maintenance (air filters, bearings, ...). Systems built like this are actually designed to fail. Whereas a highly capillary active wall system is designed to last. It is designed to maintain itself.
NHL is not capillary active enough to keep a wall dry by itself and a pure lime (or even earth) system will.

>Your mix is interesting, but even just a simple hydrated lime and sand mix would do the job.

It would, but it would be significantly more expensive and less eco-friendly, since lime burning requires a lot of energy input. The truth is, you don't need that much lime. And if you look at historic properties, more often than not, brick was laid with earth/lime mortar and the same goes for plasters.

Also, quicklime is much more economical and scientific research suggests that it yields superior mortar. Quicklime expands well over 200% upon slaking and and quicklime is usually slightly less expensive than the same amount of hydrated lime. So after slaking, your quicklime is actually more than half the expense of the hydrated lime. And like said, there is some evidence that it creates a superior mortar.

The reason why my base coat(s) are lime-loam-sand is because you would only need 5% quicklime (15%'ish after slaking) to 15% clay and 70% aggregate (silt and sand). This is a very strong mix and it is extremely capillary active. But above all: it's "dirt" cheap.
 
Back
Top