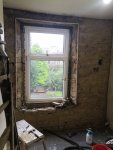
Float and set around window with 30-40 degree corners

Jedward88

New Member
Hi all,

I have had a browse through the forum already, but can't find anything concrete which seems to fit my specific situation. Apologies if I'm being particularly blind.

I am working on replastering an external wall in my victorian terrace, which is a mixture of brick and stone whose original plaster was shot. I have pulled it all off now and I am happy with the surface preparation and the basic principles of float and set ( i think these are the correct words?), having done a couple of similar walls and a ceiling previously. However, I have not encountered external corners before now, and am not sure how best to account for them.

The original window used wooden beads for the change in angle, but I can only find a reference to 90-degree corner beads, so what would be the recommended technique to form these corners?

Do I use stop beads and do one side of the corner at a time, and if so, should they be set in place before the hardwall is applied, or immediately prior to skimming?

The head of the window comprises a wooden board. with lathe and plasterwork over this - is the best approach to plasterboard this section?

thanks in advance,

J
 

Attachments

  • Float and set around window with 30-40 degree corners
    IMG_20200817_114036.jpg
    2.8 MB · Views: 353
“...can't find anything concrete which seems to fit my specific situation...“

You won’t
That comes from years of experience which you don’t have and can’t just read about on line.
More you read the more you will get lost because knowledge can’t out pace understanding imo.
You are not gonna hire a spread and will do it yourself regardless and then you’ll understand more.

I like a continuous curve no beads but better with a wooden sash window look that?
 
Its a solid wall mate no cavity either limelite or dry coat or stud wall with 25mm celotex and duplex boards

thanks a lot for a helpful response

the wall has previously been patched with normal plaster and also cement in different places - are these patches only better attached because they're newer then?

Limelite seems like an interesting solution - it does mention not hanging wallpaper or tiles over it - is this a common failure mode for lime plaster?

Am i right to say that Dri-coat resists water ingress from the solid wall into the room, but that if sufficient moisture ends up in the wall (i'm assuming from atmosphere/rain rather than rising as it's upstairs) then that will find it hard to escape?

The dricoat guidance states that it designed for use after damp proof course installation - does this mean that it is intended for cavity walls where damp has risen previously, i.e. it won't struggle to set due to being on a very wet surface?

the third option that you present, using duplex - this effectively creates an air cavity between the drylining and the stonework - what happens to condensation which forms on the back of the boards?
 
You won’t
That comes from years of experience which you don’t have and can’t just read about on line.
More you read the more you will get lost because knowledge can’t out pace understanding imo.
You are not gonna hire a spread and will do it yourself regardless and then you’ll understand more.

I like a continuous curve no beads but better with a wooden sash window look that?

of course, which is why I came to a forum which designed for this sort of questions - to ask from those with experience, and of course i will attempt this myself, and if it works or fails, then yes i will learn regardless - how else can one do it but by trying?

By continuous curve, do you mean formed entirely in the base coat (whatever that may be) and then skimmed, or do you reinforce it as well? I can see larger radius bends being manageable, but surely a small radius will concentrate too much stress ?
Larger Radius yes
Would go lime based
You can put hessian in to re in force but that is all too suit an old look as I said with a wooden sash window and a window board big enough to sit on.
With a UPVC window just square it off
 
of course, which is why I came to a forum which designed for this sort of questions - to ask from those with experience, and of course i will attempt this myself, and if it works or fails, then yes i will learn regardless - how else can one do it but by trying?

By continuous curve, do you mean formed entirely in the base coat (whatever that may be) and then skimmed, or do you reinforce it as well? I can see larger radius bends being manageable, but surely a small radius will concentrate too much stress ?

Your looking at using expensive products that will cost you more to do twice youreslf than once to pay a pro
 
Easiest for you is to put timber back in, then you've only got the flat bits to do. That's why they used timber in the first place.
not sure but that looks like an exposed roll edge feature, but it might be a simple radiused timber corner
 
Back
Top