sparkypenguin
New Member
Hi all,
I am a first time self builder attempting to do most of the work myself and I have just started to board out my house.
As with most of the tasks I have undertaken to date I have found that you can get a reasonable amount of knowledge before you start a job from the tech guys and from general googling but then you find that you have more specific questions and a reasonable amount of conflicting advice.
Hence this call for help!
I have no intention to do any plastering and I have not yet chosen a plaster yet but I would like to ensure that all of the boarding is done to a high standard that will prevent future issues and make the plasterers life as easy as possible.
I have approx. 370 boards to do in total so any advantage I can get is going to make a big difference.
So here goes including photo's of my work so far showing some of my amateur / learning mistakes.....
For the stud walls and ceilings I am using screws but also a tube of grip adhesive on all joists and also along the edges of all boards so once they are butted up they are theoretically glued together.
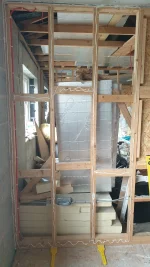
It does take longer and costs more but I believe that it can only help as long as it will not cause me any issues.
I am also using lots of screws, possible more than what is the norm, will this weaken the board?
Any thoughts appreciated.
Should any gaps >?mm between the boards and at the junctions etc be pre-filled with the appropriate filler before taping / skimming?
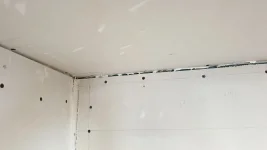
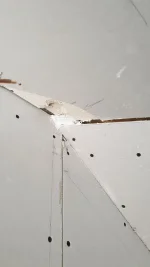
Should any loose paper / crushed board be cut out / removed?
Do I need to do anything where the paper edges of the board are not clean cut?
Should I be using blue grit anywhere, for example of the timber that is visible in the gaps?
I would also appreciate any advice on cutting the boards as when I cut and snap I find that the backing paper starts to pull away from the back of the boards.
I have tried only snapping back a little but no matter what I do the paper still comes away.
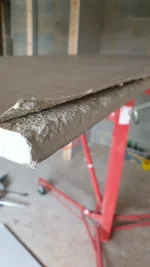
I have taken to cutting all the way through the board and or scoring both sides before snapping but these both add a significant amount of time.
Am I doing something wrong?
Do I need to worry about the paper coming away?
When cutting the boards I am creating a reasonable amount of offcuts, especially as my first area was quite a complicated shaped corridor.
I have been trying to use these offcuts as much as possible but I am aware that there is a balance between the cost of the boards and the added cost / complication of more joins etc.
At what size offcut should I just accept it’s for the skip?
Any thoughts?
For the outlets I am unsure as to how to prep for the plasterer.
I have experienced issues in the past with cracking etc around sockets and I want to minimise this risk.
I have tried a few ides so far.
On some of the walls I can fit the back box so that the face of it is level with the timber and therefore I could leave any cutting until after skimming, would this help?
Alternatively I have cut a small hole in the centre in some area’s so I know where they are, would this help the plasterer?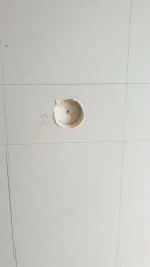
On the DnD walls I can attempt to keep the cut as tight as possible and ensure that adhesive is placed around them to support the board.
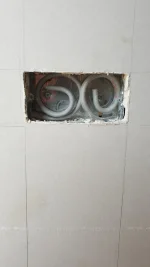
I could use the socket beads if they are worth it?
When should I be using paper for the joins and when mesh tape?
Most of the tech guys state tape but most plasterers, in my limited experience, seem to use mesh.
Is it a case of using mesh for bigger gaps so that the plaster can penetrate and fill the gap or should all gaps be filled in advance?
What are peoples thoughts on wall boarding horizontally?
I’ve read a few articles on the benefits which include…
Fewer seams - Horizontal hanging reduces the lineal footage of seams by about 25%. Keeping the footage of seams to a minimum will result in less taping and a better looking finished job.
Hides uneven studs -Hanging horizontally also allows the drywall to flow over the framing so that bowed studs create less of a problem. If the drywall were hung vertically and a seam placed on a bowed out stud, the seam would be magnified because of the bump in the wall.
Easier to finish - A horizontal seam 48 inches or 54 inches off the floor is easier to finish uniformly, especially when compared to a vertical seam, which requires reaching up high and bending down low to finish.
Most of the time I have been using the special plasterboard screwdriver bits, if I just screw in until it stops driving the screw it does seem to countersink quite far but does not break the paper. I think it achieves this by the outer rim of the bit compressing the board around the hole.
Is this correct I should I stop screwing earlier?
Do the black or zinc screws require any priming before plastering?
Does it matter how long plasterboard is on the walls before skimming?
Some DnD specific questions….....
Should I be placing a full line of adhesive along all edges of the boards?
I know I should for skirting and I think I need to at the top but what about the vertical joins?
How important is it that the total wall ends up plumb?
This may sound like a daft question but it’s based on my experience of having to find a compromise whilst tiling and the difficulty of achieving a perfectly flat service.
I have watched several videos and they all seem to show how to get one board nice and plumb but never mention the next few boards, surely even a small variation in the starting angle on the first board could result in the last board of a long run being significantly out from the wall.
I have toyed with the idea of using pre drawn datum lines on the floor, walls, ceiling etc and even adding some form of battens to work too, or building string.
I understand the basic principle of finding the high spot on the wall and working from that but most DnD I have seen done they seem to just start from one wall and work across hitting the board with a straight edge and using a spirit level whilst showing no regard to the subsequent boards wall until they get there.
I have read and am fairly confident that I should be PVA’ing the block walls before DnDing.
I am using approx.. 4-1 mix which I think is OK.
Should I do the full wall or just where I am going to apply the adhesive?
Does it work on aircrete blocks as well as the traditional blocks?
Also a couple of question about the final skimming and what is deemed acceptable.....
My friend has recently had an extension skimmed and I have been popping down on a regular basis to have a look.
The plaster, who I am considering using, did all of the DnDing and my friend did the ceiling.
Things I noticed that I was concerned about included….
Gaps of up to 20mm wide and deep being mesh taped over and then skimmed with no pre filling.
Visible mesh after the final skim coat that can be felt.
Visible angle bead on angel bead joins and not particularly joined well.
Gaps in the plasterboard that the plasterer cut around the sockets of up to 10mm, subsequently the skimming filled these but a couple have already cracked.
When I put a 2m straight edge on one of the walls the middle was about 3mm out.
I am aware that I am a bit of a perfectionist so are my concerns justified?
Other photo's....
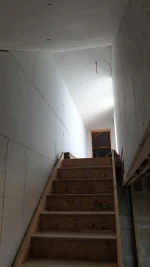
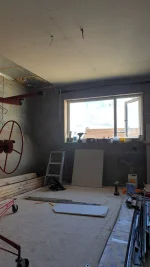
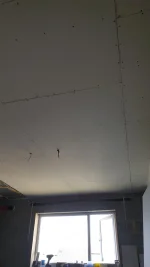
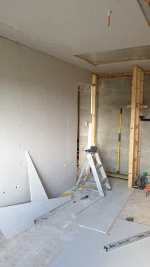
Any general comments about any issues in any of my photo's that I have missed are most welcome and I can upload bigger photo's if that helps.
Any help much appreciated.
I am a first time self builder attempting to do most of the work myself and I have just started to board out my house.
As with most of the tasks I have undertaken to date I have found that you can get a reasonable amount of knowledge before you start a job from the tech guys and from general googling but then you find that you have more specific questions and a reasonable amount of conflicting advice.
Hence this call for help!
I have no intention to do any plastering and I have not yet chosen a plaster yet but I would like to ensure that all of the boarding is done to a high standard that will prevent future issues and make the plasterers life as easy as possible.
I have approx. 370 boards to do in total so any advantage I can get is going to make a big difference.
So here goes including photo's of my work so far showing some of my amateur / learning mistakes.....
For the stud walls and ceilings I am using screws but also a tube of grip adhesive on all joists and also along the edges of all boards so once they are butted up they are theoretically glued together.

It does take longer and costs more but I believe that it can only help as long as it will not cause me any issues.
I am also using lots of screws, possible more than what is the norm, will this weaken the board?
Any thoughts appreciated.
Should any gaps >?mm between the boards and at the junctions etc be pre-filled with the appropriate filler before taping / skimming?


Should any loose paper / crushed board be cut out / removed?
Do I need to do anything where the paper edges of the board are not clean cut?
Should I be using blue grit anywhere, for example of the timber that is visible in the gaps?
I would also appreciate any advice on cutting the boards as when I cut and snap I find that the backing paper starts to pull away from the back of the boards.
I have tried only snapping back a little but no matter what I do the paper still comes away.

I have taken to cutting all the way through the board and or scoring both sides before snapping but these both add a significant amount of time.
Am I doing something wrong?
Do I need to worry about the paper coming away?
When cutting the boards I am creating a reasonable amount of offcuts, especially as my first area was quite a complicated shaped corridor.
I have been trying to use these offcuts as much as possible but I am aware that there is a balance between the cost of the boards and the added cost / complication of more joins etc.
At what size offcut should I just accept it’s for the skip?
Any thoughts?
For the outlets I am unsure as to how to prep for the plasterer.
I have experienced issues in the past with cracking etc around sockets and I want to minimise this risk.
I have tried a few ides so far.
On some of the walls I can fit the back box so that the face of it is level with the timber and therefore I could leave any cutting until after skimming, would this help?
Alternatively I have cut a small hole in the centre in some area’s so I know where they are, would this help the plasterer?

On the DnD walls I can attempt to keep the cut as tight as possible and ensure that adhesive is placed around them to support the board.

I could use the socket beads if they are worth it?
When should I be using paper for the joins and when mesh tape?
Most of the tech guys state tape but most plasterers, in my limited experience, seem to use mesh.
Is it a case of using mesh for bigger gaps so that the plaster can penetrate and fill the gap or should all gaps be filled in advance?
What are peoples thoughts on wall boarding horizontally?
I’ve read a few articles on the benefits which include…
Fewer seams - Horizontal hanging reduces the lineal footage of seams by about 25%. Keeping the footage of seams to a minimum will result in less taping and a better looking finished job.
Hides uneven studs -Hanging horizontally also allows the drywall to flow over the framing so that bowed studs create less of a problem. If the drywall were hung vertically and a seam placed on a bowed out stud, the seam would be magnified because of the bump in the wall.
Easier to finish - A horizontal seam 48 inches or 54 inches off the floor is easier to finish uniformly, especially when compared to a vertical seam, which requires reaching up high and bending down low to finish.
Most of the time I have been using the special plasterboard screwdriver bits, if I just screw in until it stops driving the screw it does seem to countersink quite far but does not break the paper. I think it achieves this by the outer rim of the bit compressing the board around the hole.
Is this correct I should I stop screwing earlier?
Do the black or zinc screws require any priming before plastering?
Does it matter how long plasterboard is on the walls before skimming?
Some DnD specific questions….....
Should I be placing a full line of adhesive along all edges of the boards?
I know I should for skirting and I think I need to at the top but what about the vertical joins?
How important is it that the total wall ends up plumb?
This may sound like a daft question but it’s based on my experience of having to find a compromise whilst tiling and the difficulty of achieving a perfectly flat service.
I have watched several videos and they all seem to show how to get one board nice and plumb but never mention the next few boards, surely even a small variation in the starting angle on the first board could result in the last board of a long run being significantly out from the wall.
I have toyed with the idea of using pre drawn datum lines on the floor, walls, ceiling etc and even adding some form of battens to work too, or building string.
I understand the basic principle of finding the high spot on the wall and working from that but most DnD I have seen done they seem to just start from one wall and work across hitting the board with a straight edge and using a spirit level whilst showing no regard to the subsequent boards wall until they get there.
I have read and am fairly confident that I should be PVA’ing the block walls before DnDing.
I am using approx.. 4-1 mix which I think is OK.
Should I do the full wall or just where I am going to apply the adhesive?
Does it work on aircrete blocks as well as the traditional blocks?
Also a couple of question about the final skimming and what is deemed acceptable.....
My friend has recently had an extension skimmed and I have been popping down on a regular basis to have a look.
The plaster, who I am considering using, did all of the DnDing and my friend did the ceiling.
Things I noticed that I was concerned about included….
Gaps of up to 20mm wide and deep being mesh taped over and then skimmed with no pre filling.
Visible mesh after the final skim coat that can be felt.
Visible angle bead on angel bead joins and not particularly joined well.
Gaps in the plasterboard that the plasterer cut around the sockets of up to 10mm, subsequently the skimming filled these but a couple have already cracked.
When I put a 2m straight edge on one of the walls the middle was about 3mm out.
I am aware that I am a bit of a perfectionist so are my concerns justified?
Other photo's....


Any general comments about any issues in any of my photo's that I have missed are most welcome and I can upload bigger photo's if that helps.
Any help much appreciated.
