Danny
-
@LarryTheLag you will get it in the end 
@LarryTheLag you will get it in the end
Who needs the gym when you're up and down on the hop faster than a granny wheeling her trolley towards a 50% tesco discount on potatoes

Larry, you've been on this site 5 days or something and I've never seen an entrance like it. Everyone loves you mate. I really hope it works out for you bud. you're attitude is brillian
Appreciate it Larry. Don't think @Danny will send me a tpf mug to Poland though. hahaThankyou @Danny I'd like to donate my TPF mug to @maltman777 , not only do we share the same height, but the same biscuits and that is true brotherly love
PS - could have been worse - could have been an accountant
Appreciate it Larry. Don't think @Danny will send me a tpf mug to Poland though. haha
HAHAHA your display picture is someone behind bars!!!!!
Have you not got a real picture of you behind bars mate? that would be so sound!
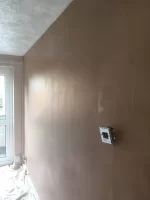
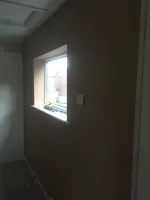
Why are you hanging your boxers on the client's clothes horse ya dirty basatrd. hope you're not skimming that wall naked@LarryTheLag im not local so tried take a few pictures today to help show what I’m saying
Walls were pva’d and left to dry. Pic 1
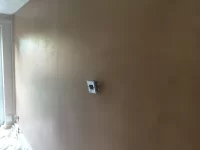
First coat on, try keep it reasonable but don’t mess with it at all. Put it on and don’t touch it. Pic 2
As your learning the gear probably too far gone to use for second coat so mix up a smaller amount and bit thinner
Put second coat on exactly the same way. First coat should still be bit wet so you’re actually flattening the first coat by applying the second. Pic 3
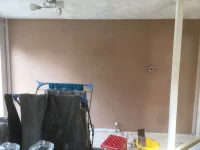
Once this coats on immediately go across it with your speedskim
Now leave it for a bit then trowlel
Up when it gone in a bit.Tip. If you’re creating lines its too soon. But don’t leave it too long. Keep an eye on it
Trowel up remove lines fill any bits and leave it, should be nice at this point
Leave for bit till firmed up then cross trowel it use water if needed pic 4
Why are you hanging your boxers on the client's clothes horse ya dirty basatrd. hope you're not skimming that wall naked
Knew itI’m wearing the customers thong
@LarryTheLag im not local so tried take a few pictures today to help show what I’m saying
You never gone in such details for @maltman777 and he was on here before Larry !?! And next time do what everyone on here does- take a picture while the plaster is still wet and shiny, this way no one can see the low spot left of the switch@LarryTheLag im not local so tried take a few pictures today to help show what I’m saying
Walls were pva’d and left to dry. Pic 1
First coat on, try keep it reasonable but don’t mess with it at all. Put it on and don’t touch it. Pic 2
As your learning the gear probably too far gone to use for second coat so mix up a smaller amount and bit thinner
Put second coat on exactly the same way. First coat should still be bit wet so you’re actually flattening the first coat by applying the second. Pic 3
Once this coats on immediately go across it with your speedskim
Now leave it for a bit then trowlel
Up when it gone in a bit.Tip. If you’re creating lines its too soon. But don’t leave it too long. Keep an eye on it
Trowel up remove lines fill any bits and leave it, should be nice at this point
Leave for bit till firmed up then cross trowel it use water if needed pic 4

You never gone in such details for @maltman777 and he was on here before Larry !?! And next time do what everyone on here does- take a picture while the plaster is still wet and shiny, this way no one can see the low spot left of the switch
That’s a good point, @maltman777 should ask himself that as I’ve offered advice to a few. Also offered work out on here and tried multiple times to throw work to @ChrispyUK
No lows on my work thankyou very much lol. Ironically I much prefer to see it dried out. Hate it when just finished and hate it even more when its half dry
Was 1 of 3 walls 1 gauge nice little day today home by 1 @John j
X
Soon mate....and I do appreciate the offer x
Anytime just let me know booked til January at min so get your s**t together lolx
Lol
Not sure I'm booked till Jan, but not too far off. Tbf, it would be a breath of fresh air to hook up m8, I'm bored at mo

Thankyou very much for the time taken out of your day to do that for me - really appreciated, the pictures certainly help
Couple of questions!
A) Was the pva put on neat and how many layers do you usually do?
B) How long from the first mud on the hawk to finishing the last trowel take you for the first layer?
C) Did you finish the wall and then go back to flatten, or did you do a portion, flattern and then move on?
D) How long did you leave it between setting to work the final trowel?
Plot twist - I'm the customer")
Same i need company . This forums sending me loopyLol
Not sure I'm booked till Jan, but not too far off. Tbf, it would be a breath of fresh air to hook up m8, I'm bored at mo

Ha ha, yep me and Lurpy are for real. we are eloping


 . Fecking brilliant